| Red Hat Documentation |
 |
Chapter 2. Welcome to LinuxWhat began in 1991 as a hobby for a young Finnish student named Linus Torvalds has ballooned from a "hacker's darling" into an important tool for both home and business users. Just six years ago, there were an estimated 100,000 users. Today, millions of users worldwide depend on Linux to manage finances, use and control Internet services, create artwork and more. That number is rapidly growing; every day, new users are discovering the power and potential of Linux. This free operating system is a multitasking, multi-user environment that has superior memory management, great security features, and more. In other words, power and, once you become more comfortable with Linux, ease of use.
What do you do next? Relax. In the chapters that follow, we'll show you the basics of your new operating system, from fundamental tasks such as creating a new user account and getting online to tips on how to install and manage new software. A Note About ConventionsAt the time you installed your Red Hat Linux system, you were given the option of working entirely in a GUI, or graphical user environment, such as GNOME, or logging in from console mode,, which is non-graphical. If you're like many new Linux users, you're familiar with graphical environments such as Microsoft Windows, Apple Macintosh or IBM's OS/2. How to Find an XtermYou likely chose to work in a GUI when you installed Red Hat Linux 6.1. You'll find plenty of opportunities to "point and click" on applications, either on your desktop or from the Panel, at the bottom of your desktop. But we're also going to try to dedicate some time to working from the shell prompt. Why? Because at the same time you accomplish tasks, you can learn a little more about how your Red Hat Linux system works.
There are plenty of ways to get a shell prompt, depending on the kind of graphical environment you're using, such as GNOME. Often, just by right- or left-clicking in a blank space on your desktop, you'll see a reference to an Xterm, or terminal. If you right-click on an empty space on your GNOME desktop, a menu will direct you to New => Terminal. Allow your cursor to highlight the Terminal entry, then release the button. By "dragging" your cursor over that item and releasing the button you will open a shell prompt window. Other times, you'll find you can get to a shell prompt through the menu on your desktop. In addition to Xterm, other references which will give you the shell prompt include:
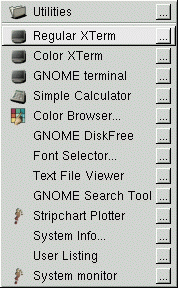
Since we'll use GNOME as our example, you'll find an alternative method of opening an Xterm window is from the Main Menu. You can do this by taking your cursor to the Main Menu Button, the stylized GNOME "footprint" on the Panel. Now, left-click once on the Main Menu Button (see Figure 2-1), and a menu of "folders" will pop up. These folders represent categories of various software groups on your system. There are utilities, graphics programs, Internet applications and many more. Once the menu items appear, "drag" the cursor to the Utilities section of the menu by holding down the mouse button while raising the mouse to the Utilities folder. When you're over the folder, a new menu pops up to its right, revealing a submenu of applications in the Utilities category. Here, in the first entries of this new submenu, there is a choice of terminal windows: Regular Xterm, Color Xterm and GNOME terminal (as shown in Figure 2-2). To get a shell prompt, position the cursor over the terminal window of your choice, and release the mouse button.
Now, it's time to take your first steps. |
|