| Red Hat Documentation |
 |
Chapter 3. System ConfigurationAfter installing your Red Hat Linux system, it's easy to think that the decisions you made during the installation are engraved in granite, never to be changed again. Nothing could be further from the truth! One of the main strengths of Linux is that the operating system can be configured to do just about anything. Here at Red Hat, we try to make system configuration as easy and accessible as possible. To that end, we've worked hard on two fronts:
Anyone familiar with Red Hat Linux over the years has probably seen what we call our "control panel" system configuration tools. These tools have been developed by Red Hat to make system configuration easier. And while these tools do make life easier for the Red Hat Linux user, we began a search for a system configuration tool with even more flexibility and power. Our search ended with the inclusion of Linuxconf into Red Hat Linux 5.1 in June 1998. One of Linuxconfs greatest strengths is the incredible range of configuration options under its control. But what about the control panel tools? They're still there. While Linuxconf at present can do nearly everything the control panel tools can, there are two areas in which the control panel still holds the upper hand:
But now, let's take a look at Linuxconf… System Configuration With LinuxconfLinuxconf is a utility that allows you to configure and control various aspects of your system, and is capable of handling a wide range of programs and tasks. Fully documenting Linuxconf could be a separate book in its own right and certainly more than we can cover in this chapter. So we'll focus on those areas that address common tasks such as adding new users and getting connected to a network. More information on Linuxconf, including its status, most recent release, and more can be found at the Linuxconf Project homepage: http://www.solucorp.qc.ca/linuxconf/ This website includes fairly extensive information on Linuxconf including description, rationale, history, list of contacts and a lot of other information in addition to the software itself. It is maintained by Linuxconf's creator, Jacques Gelinas, so it's the best source of Linuxconf information on the Internet. NotationAccurately describing the location of specific screens within Linuxconf is easy, but lengthy given Linuxconf's hierarchical nature. If the structure was a family tree, most of the data entry screens are in the fourth generation. To describe the path to the screen where you would add new users to your system, we could write this out as:
Rather lengthy and not immediately accessible. Given the structural similarity to a family tree, we could write it as:
But that's an awful lot of begets. Instead, we'll use the following format: Config => Users accounts => Normal => User accounts It's more concise and clear. It assumes as its base the Linuxconf entry screen. The other advantage to this approach is that it's not interface specific, so regardless of which interface you're using, you know exactly where the information is. Running LinuxconfTo run Linuxconf you must have root access. If you are logged in as something other than root, there is an easy way to handle this situation. Use the su command to become root. In case you aren't familiar with it yet, type su at the shell prompt and press Enter. The password you're asked to provide is the root account's. Now, type linuxconf at the shell prompt to begin the program. Linuxconf has the following user interfaces:
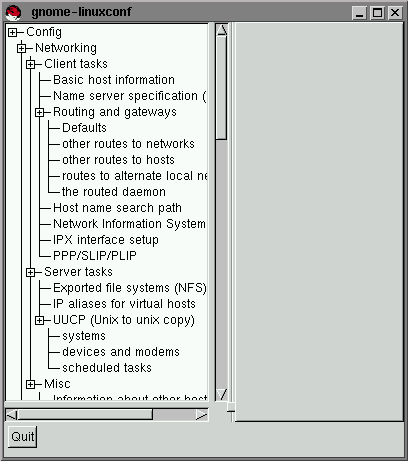
Linuxconf will normally start in either character-cell or X mode, depending on the DISPLAY environment variable. The first time you run Linuxconf, an introductory message will be shown; although it is only displayed once, accessing help from the main screen will give you the same basic information. Linuxconf has context-specific help available. For information on any specific aspect of Linuxconf, please select Help from the screen you'd like help with. Note that not all help screens are complete at this time; as help screens are updated, they will be included in subsequent versions of Linuxconf. Tree Menu InterfaceLinuxconf comes complete with a tree menu interface. Finding the appropriate panel should be simple and fast. You can collapse and expand sections by clicking on the menu item icons. Click the icon once to activate it for that particular sub-menu. A single click will then collapse it; another single click will expand it again. Selected entries will appear as tabs in the right-hand panel and will remain there until closed. This will greatly reduce the clutter of windows on your desktop that Linuxconf has typically caused. If you end up with more tabs open than you like, just select Cancel on the bottom of each tab to close it without making any changes, or Accept to implement them.
Enabling Web-Based Linuxconf AccessFor security reasons, Web-based access to Linuxconf is disabled by default. Before attempting to access Linuxconf with a Web browser, you'll need to enable access. Here's how to do it from the text-mode interface:
At this point, Web-based access has been enabled. To test it out, go to one of the systems that you added to the access control list. Then, launch your Web browser, and enter the following URL:
(Replacing <host> with your system's hostname, of course.) You should see the main Linuxconf page. Note that you will need to enter your system's root password to gain access beyond the first page. Adding a User Account -- Quick Reference
Adding a User Account -- General OverviewAdding a user is one of the most basic tasks you will encounter in administering your system. To add a user:
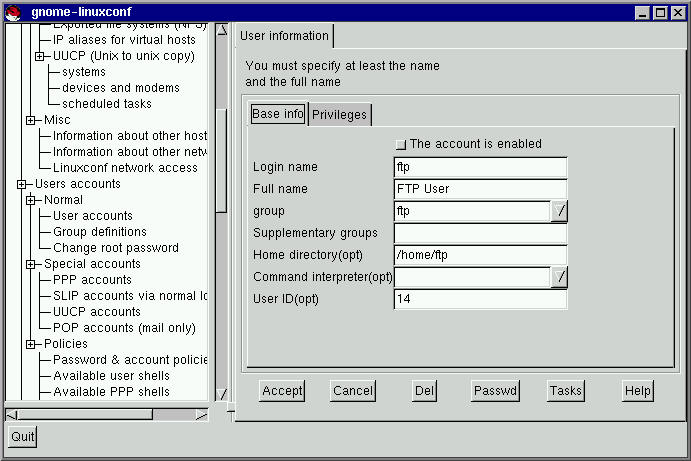
The User account creation tab is where you enter all the information on the new account. There are a number of fields you should be aware of, some required, some optional. Required Fields:
Optional Fields:
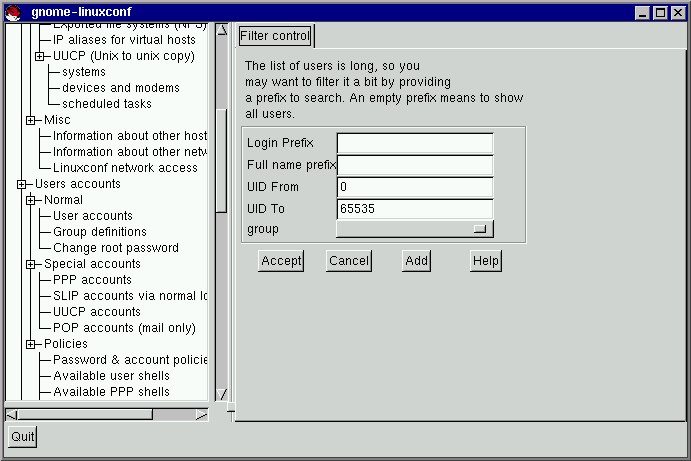
The User account creation screen has a number of fields; only the login name is required, though filling in the Full name field is strongly recommended. Once you have entered the login name and any other desired information select the Accept button at the bottom of the screen. If you decide against creating a new user, select Cancel instead. When you click on Accept Linuxconf will prompt you to enter the password. There is also a field called Confirmation where you will need to type the password again. This is to prevent you from mistyping the password. Passwords must be at least 6 characters in length. They may contain numbers as well as a mix of lowercase and uppercase letters. Press the Accept button again when finished. Modifying a User Account -- Quick Reference
Modifying a User Account -- General Overview
On the User information screen, the information can be changed as desired. To implement the changes select Accept. If you decide against making any changes select Cancel. This guarantees that no changes are made. Changing a User's Password -- Quick Reference
Changing a User's Password -- General Overview
Linuxconf will then prompt you to enter the new password. There is also a field called Confirmation where you will need to type the password again. This is to prevent you from mistyping the password. Passwords must be at least 6 characters in length. They may contain numbers as well as a mix of lowercase and uppercase letters. If you decide against changing the password, just hit Cancel. Once you have entered the new password select Accept. Changing the root Password -- Quick Reference
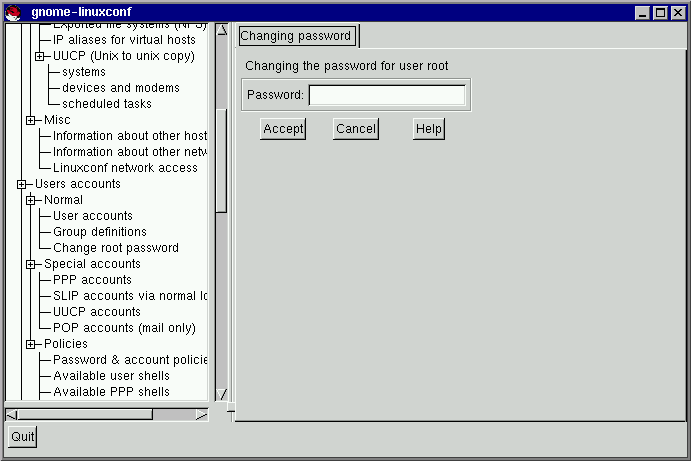
Changing the root Password -- General OverviewChanging the roots password isn't handled in the same manner as changing a user's password. Because of both the importance and security considerations surrounding root access, Linuxconf requires you to verify that you currently have access to the root account.
Here, Linuxconf wants the current root password to verify access to the root account. Linuxconf does require root access to run, but once running there's nothing to keep anyone from sitting down at the computer if the person using Linuxconf steps out for a minute. The potential pitfalls are extensive! If the person who was originally using Linuxconf logs out of root, they won't be able to get back into it. A lack of validation would also give free reign over the computer to whoever had changed root's password. Once you have entered root's current password, it will prompt you for a new password. There is also a field called Confirmation where you will need to type the password again (see Figure 3-5). This is to prevent you from mistyping the password. Passwords must be at least 6 characters in length. They may contain numbers as well as a mix of lowercase and uppercase letters. If you decide against changing the root password, just hit Cancel. Once you have entered the new password select Accept. The change takes place immediately and is effective not only for logging in as root, but also for becoming root using the su command. Disabling a User Account -- Quick Reference
Disabling a User Account -- General OverviewWhy disable an account? Good question! There's no single answer, but we can provide some reasons why this option is available. The biggest reason is security. For example, you may have created a special account to be used by clients, co-workers, or friends to access specific files on your system. This account gets used from time to time, but should only be used when you know there's a need. Leaving an unused account around is a target for people who'd want to break into your system. Deleting it requires you to recreate it every time you want to use it. Disabling an account solves both problems by allowing you to simply select or de-select a check-box. To disable an account:
The account is disabled and can be enabled later using a similar method. Enabling a User AccountBy default, all newly created user accounts are enabled. If you need to enable an account, you can use Linuxconf to do it.
Deleting a User Account -- Quick Reference
Deleting a User Account -- General Overview
To delete an account:
Linuxconf will then prompt you with a list of options. The default option is to archive the account's data. The archive option has the following effects:
Selecting Delete the account's data on the Deleting account <accountname> screen (see Figure 3-8) will:
Selecting Leave the account's data in place on the Deleting account <accountname> screen (see Figure 3-8) will:
GroupsAll users belong to one or more groups. Just as each file has a specific owner, each file belongs to a particular group as well. The group might be specific to the owner of the file, or may be a group shared by all users. The ability to read, write or execute a file can be assigned to a group; this is separate from the owner's rights. For example, the owner of a file will be able to write to a document, while other group members may only be able to read it. Creating a Group -- Quick Reference
Creating a Group -- General OverviewTo create a new group:
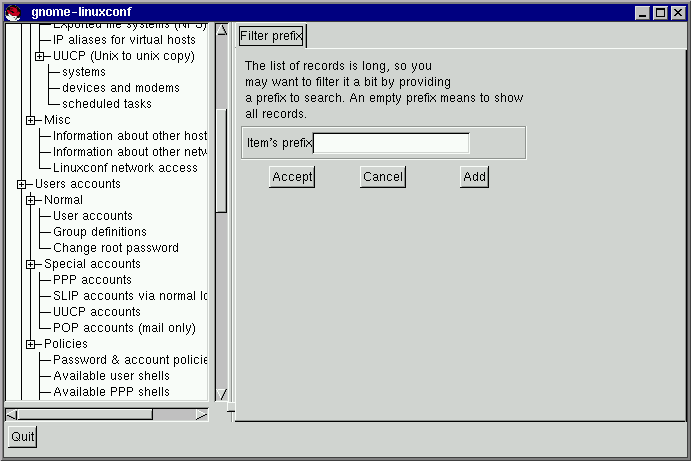
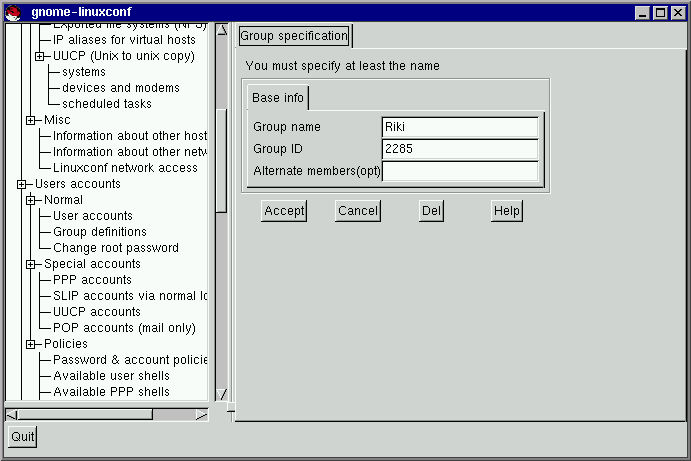
If you have more than 15 groups, you will be given the option to select the groups by providing a prefix. You may add a group directly from this screen, or move on to the User groups screen. To move on select Accept with or without a prefix, to add a new group, hit Add. Select Add at the bottom of the User groups screen. Enter a group name. You may also wish to specify members of the group and can do so in the Alternate members field. The list of users should be space delimited, meaning that each username must have a space between it and the next one. When you're finished, select Accept and the group will be created. Deleting a Group -- Quick Reference
Deleting a Group -- General OverviewTo delete a group:
If you have more than 15 groups, you will be given a filter screen (see Figure 3-9) to narrow your choice of groups by specifying a prefix.
The group's files will still remain and their respective owners will still have sole control over them. The group name will be replaced with the deleted group's ID. The files may be assigned to a new group by using the chgrp command. More information on chgrp can be found by typing the command info chgrp or man chgrp at the shell prompt. If a new group is created and the deleted group's ID is specified then the new group will have access to the deleted group's files. Don't worry, Linuxconf doesn't recycle old group numbers any more than it does old user IDs, so it won't happen by accident. Modifying Group MembershipThere are two ways to modify the list of users that belong to a group. You can either update each user account itself, or you can update the group definitions. In general, the fastest way is to update each of the group definitions. If you're planning on changing more information for each user than just the group information, then updating each user account may prove easier. Modifying Group Membership -- Quick ReferenceUnder Groups:
Modifying Group Membership -- Quick ReferenceUnder Users:
Modifying Group Membership -- General OverviewWe'll start by detailing the group definitions method.
If you have more than 15 groups, you will be given a filter screen (see Figure 3-9) to narrow your choice of groups by specifying a prefix.
This will automatically update each user account with the group showing up in the Supplementary groups field if added or absent if removed. Adding and removing groups can also be done by modifying each individual user account.
If you have more than 15 accounts on the system, Linuxconf will provide you with a filter screen (see Figure 3-2).
This will automatically update the group definitions. Repeat the process for each user. CD-ROMs, Diskettes, Hard Drives and Filesystems -- the Inside TrackA filesystem is composed of files and directories, all starting from a single root directory. The root directory may contain any number of files and other directories, with each directory in turn following suit. The average filesystem often looks like an inverted tree with the directories as branches and the files as leaves. Filesystems reside on mass storage devices such as diskette drives, hard drives, and CD-ROMs. For example, a diskette drive on DOS and Windows machines is typically referenced by A:\. This describes both the device (A:), and the root directory on that device (\). The primary hard drive on the same systems is typically referred to as the "C" drive because the device specification for the first hard drive is C:. To specify the root directory on the C drive, you would use C:\. Under this arrangement, there are two filesystems -- the one on A:, and the one on C:. In order to specify any file on a DOS/Windows filesystem, you must either explicitly specify the device on which the file resides, or it must be on the system's default drive (which is where DOS' infamous C prompt comes from -- that's the default drive in a system with a single hard drive). Under Linux, it is possible to link the filesystems on several mass storage devices together into a single, larger, filesystem. This is done by placing one device's filesystem "under" a directory on another device's filesystem. So while the root directory of a diskette drive on a DOS machine may be referred to as A:\, the same drive on a Linux system may be accessible as /mnt/floppy. The process of merging filesystems in this way is known as mounting. When a device is mounted, it is then accessible to the system's users. The directory "under" which a mounted device's filesystem becomes accessible is known as the mount point. In the previous paragraph's example, /mnt/floppy was the diskette drive's mount point. Note that there are no restrictions (other than common conventions) as to the naming of mount points. We could have just as easily mounted the floppy to /long/path/to/the/floppy/drive. One thing to keep in mind is that all of a device's files and directories are relative to its mount point. Consider the following example:
So, if the above describes the individual filesystems, and you mount the CD-ROM at /foo, the new operating system directory structure would be:
To mount a filesystem make sure to be logged in as root, or become root using the su command. For the latter, type su at the shell prompt and then enter the root password. Once you are root, type mount followed by the device and then the mount point. For example, to mount the first diskette drive on /mnt/floppy, you would type the command mount /dev/fd0 /mnt/floppy. At installation, Red Hat Linux will create /etc/fstab. This file contains information on devices and associated mount points. The advantage to this file is that it allows you to shorten your mount commands [1] . Using the information in /etc/fstab, you can type mount and then either the mount point or the device. The mount command will look for the rest of the information in /etc/fstab. It's possible to modify this file by hand, or by using Linuxconf. To use Linuxconf, please see the section called Reviewing Your Current Filesystem -- Quick Reference immediately following. Reviewing Your Current Filesystem -- Quick Reference
Reviewing Your Current Filesystem -- General OverviewWe'll start by looking at your current directory structure.
The fields are:
Filesystems from other machines on a network may also be available. These can range from single small directories to entire volumes. No information on Size or Partition type is available for these partitions, either. Additional information on these filesystems (should you have any available) will be contained under: Config => File systems => Access nfs volume The screen is similar to the Local volume screen (see Figure 3-12), with some notable differences in the information provided for each entry:
Adding NFS Mounts -- Quick Reference
Adding NFS Mounts -- General OverviewNFS stands for Network FileSystem. It is a way for computers to share sections of their local filesystem across a network. These sections may be as small as a single directory, or include thousands of files in a vast hierarchy of directories. For example, many companies will have a single mail server with individuals' mail files served as an NFS mount to each users' local systems. To add an NFS mount:
The three fields on the Base tab are what you'll need to concern yourself with.
This is all you need to get the mount created. Linuxconf will update your /etc/fstab file accordingly. If you are aware of additional requirements, please read the help file on the Volume specification screen and see the mount man page for more information. Once you have entered the information, select Accept. Getting Connected with Linuxconf (Network Configuration)The first thing to determine when getting hooked up is whether you're connecting to a local area network, such as a group of computers in an office, or a wide area network, such as the Internet. Before continuing, it's important to know what hardware you have and how you intend to connect. If you're going to dial into another computer, then make sure your modem is installed and that the cables are arranged properly. If you're using a network card, make sure it is installed properly and that the cables are correctly connected. Regardless of what network configuration you specify, if every phone line or cable is not in place, you'll never get connected. We'll start with modem connections and then move on to using network cards. Adding Modem/PPP/SLIP connections -- Quick Reference
Adding Modem/PPP/SLIP connections -- General OverviewRed Hat Linux 6.1 uses the utility called RP3, or the RH PPP Dialer, a graphical tool which helps users configure and monitor network accounts -- particularly PPP accounts. (To read more about RP3, see the related chapter in the Official Red Hat Linux Getting Started Guide.) However, you can still depend on Linuxconf to set up network configuration. There are several pieces of information you will need to get from your ISP (Internet Service Provider) or systems administrator before getting your PPP or SLIP account working. In the case of some providers, you may have to sort through directions on how to set up a PPP connection on a Linux system. Some ISPs are ill-equipped to handle individuals using Linux. Don't worry, you can still get connected; you just need some additional information from your ISP. The following is what you need for a connection with Red Hat Linux. The ISP representatives may respond that you don't need this information, or may suggest that you need more than this. Red Hat has streamlined the information needed using intelligent defaults and tools such as Linuxconf to simplify this process for you. Unless they have a document specifically for Red Hat Linux, just request the information below and go from there. Specifically, you'll need:
Additional information which may be helpful, but isn't necessary includes a secondary nameserver address, and a search domain. Once you have all this information, you're ready to get connected.
Initially there won't be any configurations specified. When you select Add you will be given a choice between PPP, SLIP and PLIP. PPP is the most commonly used interface and is the default. To set up a PPP connection select PPP and hit Accept. You'll see the following fields:
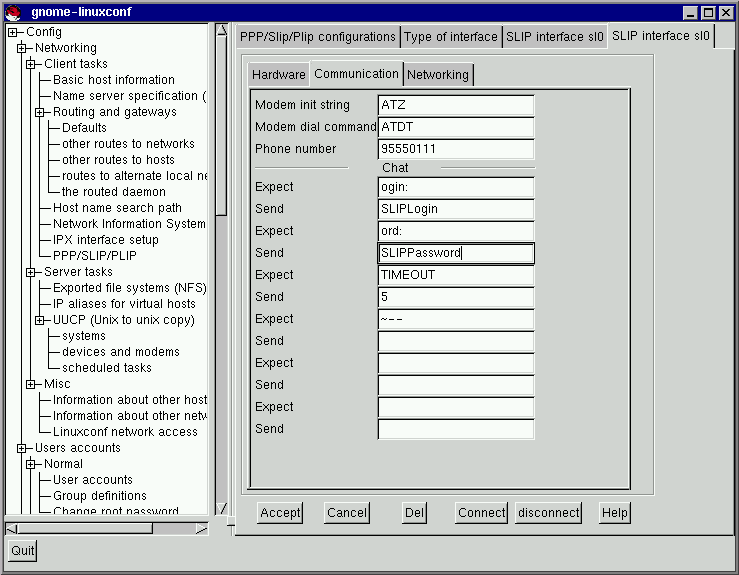
Notice that the title bar is PPP interface ppp0. ppp0 is the first PPP interface, ppp1 would be the second and so on. It's important to keep track of which interface you're using if you have more than one. SLIP connections use sl instead of ppp for their interface prefix. With the exception of a PAP authentication option, the entry screens for adding a PPP or a SLIP account are identical. Enter the complete phone number for the remote machine, and make sure to include any numbers required to access outside lines. For example, if you need to dial "9" and then the number, and the computer you're connecting to has a telephone number of "555-0111," then you'd enter "95550111." The next information you're asked for is the modem port. This is a drop down box of available ports. If you're using a dual-boot Linux/Windows system and you know the COM port your modem is on, the following map may be of use: Map to Windows COM ports are as follows:
The login name is the one for the PPP account. The password you enter will be shown in plain text, so be careful who you have around when you enter it! If you will be using PAP authentication, check the box; when you've entered the other required information, select the Customize button at the bottom of the screen. All the other information is provided on the various tabs and can be set within the Customize screen, but it's easier to find the information all in one place on the primary screen. Select the PAP tab and enter your username and then the secret the ISP has provided you in the Secret field. The other defaults should be sufficient, but if you need to, you can edit the initial settings using the Customize option. Modifying a PPP or SLIP Configuration -- Quick Reference
Modifying a PPP or SLIP Configuration -- General OverviewYou can edit an existing configuration as well as delete it by selecting it from the list on the PPP/SLIP/PLIP configurations screen.
This will open the appropriate interface screen for your configuration. If you wish to delete the configuration, the handy Del button is there at the bottom of the screen. The Modem port is on the Hardware tab and is a drop down menu. If you want to change the other settings you entered when you originally created the configuration, select the Communication tab. The first Send field contains your login, and the next Send field contains your password. The Expect fields correspond to the login: and password: prompts, which explains the ogin: and ord: entries.
Once you have made your changes, you can test to see if your configuration is working. Select Connect from the bottom of the screen. This will attempt to connect you to the remote system using the information you've entered. Once you've finished configuring and testing your setup, we recommend using the usernet utility to control your dial-up networking connection on a daily basis. See the usernet man page for more information. Other Network Connections -- Quick ReferenceDue to the number of possible choices and sub-choices, no quick reference is available for this section. Other Network Connections -- General OverviewSetting up a network connection over ethernet requires an entirely different type of setup. Network connections to token ring or arcnet networks follow a similar procedure, but will not be discussed here.
The first item on this screen is a check box to indicate whether this adaptor is enabled or not. It should be checked if this is the one you intend to use. Below that is a choice of Config modes. Manual means that you will be providing all the information and entering it yourself. DHCP and bootp retrieve their information from a remote server of the corresponding kind. If you're not sure what option to choose, talk to your network administrator. DHCP and bootp Required fields:
For DHCP and bootp configurations you only need to specify the Net device and the Kernel module. For the Net device, you will choose from a list where the eth prefix represents ethernet cards, the arc specifies an arcnet card and the tr specifies token ring cards. A complete list of network cards and their respective modules can be found in Appendix B. For the most up-to-date list, please see our website at:
The netmask information will be set by default, although depending on what kind of network you are setting up, or becoming a part of, you may need to specify this. If you are connecting to an ISP, ask them for the information. Most likely it will be 255.255.255.0 (the default). Required fields for Manual Configuration:
Information on net devices and kernel modules is described above. The appropriate primary name + domain and IP address will depend on whether you are adding the computer to an existing network or creating a new network. For connecting to an existing network, contact your network administrator for the information. Getting a network connected to the Internet is beyond the scope of this book, and we recommend the following starting point: TCP/IP Network Administration, 2nd Edition, by Craig Hunt (O'Reilly and Associates). If you're setting up a private network that won't ever be connected to the Internet, then you can choose any primary name + domain name you would like and have several choices for IP addresses (See Table 3-1). Table 3-1. Addresses available and Examples
The three sets of numbers above correspond to class a, b, and c networks respectively. The classes are used to describe the number of IP addresses available as well as the range of numbers used to described each. The numbers above have been set aside for private networks.
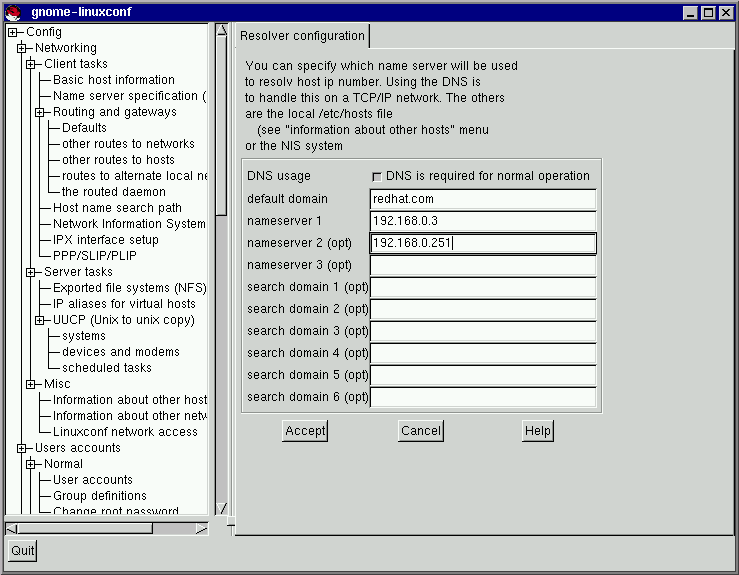
Nameserver SpecificationA nameserver and default domain are also needed to establish a network connection. The nameserver is used to translate host names such as private.network.com to their corresponding IP address such as 192.168.7.3. The default domain tells the computer where to look if a fully qualified hostname isn't specified. Fully qualified means that the full address is given, so foo.redhat.com is the fully qualified hostname, while the hostname is simply foo. If you specified your default domain as redhat.com, then you could use just the hostname to connect successfully. For example ftp foo would be sufficient if your search domain is redhat.com, while ftp foo.redhat.com would be required if it wasn't. To specify the nameserver, open Config => Networking => Name server specification (DNS). Nameservers are ranked according to the order in which they are accessed, so it's not unusual to see nameservers referred to as primary, secondary, tertiary and so on down the list if more than one is specified. Each of these must be an IP address and not a name. The computer has no way to resolve the name until it connects to a nameserver. Screamingly obvious when stated, but occasionally overlooked when people are simply asked to supply an address for a computer. In addition to a default domain, you can also specify search domains. Search domains work differently; they progress from one to six in a similar manner to the nameserver. However, they all take precedence over the default domain! Keep this in mind when specifying search domains. Search domains are not commonly used. The one item not yet covered is the check box for DNS usage. If you are running a small private network with no Internet connection, then using /etc/hosts files and keeping them all synchronized will work. As you add more and more machines, the complexity increases until it is easier to have a single machine run a DNS than to continue to sync /etc/hosts files. There is another reason for not using DNS, and that is if your network is going to use NIS instead. Note that NIS can be used in conjunction with DNS. So to sum it all up, unless you know why using /etc/hosts or NIS would be best for your situation, DNS is probably going to be your best choice. You can add, modify, or delete entries from the /etc/hosts file using Linuxconf. Open Config => Networking => Misc => Information about other hosts. To modify or delete an entry select it. To delete the entry, select Del at the bottom of the host/network definition screen. To modify it, change the information as necessary. To add a new entry, select Add at the bottom of the /etc/hosts screen. This will also open the host/network definition screen. Required Fields:
Optional Fields:
You will need to specify both the primary name + domain and the IP number. The other fields are optional. Once finished, select Accept. Date and TimeTo get to the date & time control panel:
The zone field is a pull-down list that is long and extensive. It is often designated by a large region and then a city or zone within it. Examples include Europe/Vienna and US/Eastern. There is a check box to Store date in CMOS in GMT format. Hours are specified from 0 (midnight) to 23 (11 PM). Months are specified by number as well. For the year, please specify all four digits. All other fields should be self-explanatory. Notes
|
|