| Red Hat Documentation |
 |
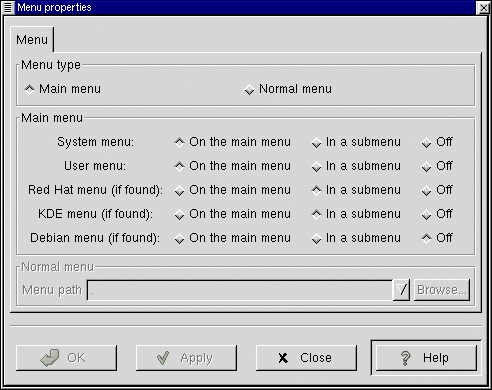
Chapter 16. Editing the Main MenuIntroductionThe Main Menu is a repository for your applications and can be found on the Panel. The Main Menu is preloaded with GNOME but is can be configured to fit your work habits. The Main Menu is broken up into two main subdirectories: the System menus and the User menus. The Menu Editor is available for you to add new applications to the Main Menu but you can not add applications to the System menus if you are not system administrator (root). In this section you will learn how to configure the Main Menu with applications you wish to use everyday. Configuring the Main MenuIf you want to change properties of the Main Menu or any other menu you have on your Panel you may right click on the menu button and select Properties. This will launch the Menu properties dialog. Figure 16-1. Menu Properties Dialog
The first selection item in the Menu properties dialog is the Menu type. This will allow you to choose for each item below whether it should be directly in the Main Menu, moved to a submenu of the Main Menu, or removed from the Main Menu entirely. The other choices in the Menu properties dialog are sub-menu selections for Main Menus. These selections allow you to choose what is in your Main Menu which you can have in the Main Menu, in a submenu, or off:
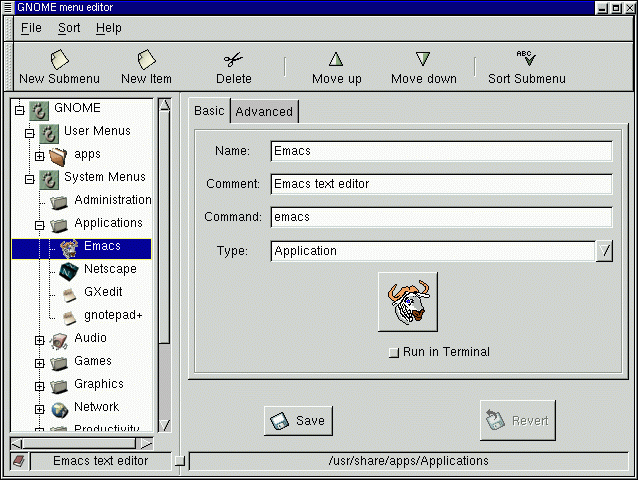
Using the Menu EditorThe Menu Editor is a configuration tool for the Main Menu. It is very useful in setting up your system to your requirements. The Menu Editor is started by clicking on the Main Menu Launcher and selecting Settings | Menu editor from the Main Menu. This will launch the Menu Editor. Figure 16-2. The Menu Editor
The Menu Editor is divided into two main panels. The left side contains the menu in its default state. The right side contains a tabbed dialog that allows you to add new applications to the menu. On the left side in the menu tree you will notice that there are two main menu lists, one for User Menus and one for System Menus. The User Menus are for the current user and the System Menus are for all users on the system. The prepackaged applications are all located in the System Menus. Within the menu list on the left side you may open and close folders and see what is in your current menu by clicking on the small plus signs beside the menus. Adding a New Menu ItemIf you want to add a new menu item press the New Item button on the toolbar. A new menu item will be added to the highlighted menu is. If you do not have a menu highlighted, it will be placed at the top of the menu tree. Select the new item and type in the information for the item in the dialog on the right. Once the information is complete press the Save button and the new menu item will be inserted at the highlighted locationon the left side menu tree. You may then move the menu item by pressing the up or down buttons on the toolbar. You may also move the menu item by dragging it with your left mouse button.
Drag and Drop in the Main MenuIn the Menu Editor - The Menu Editor supports drag and drop functionality, which will make your work easier. You may drag applications to the folders you wish them to reside in or re-arrange you folders completely. To the Panel - If you would like to place a menu item onto the Panel, you can drag and drop from the menu to the Panel and it will place a launcher there with all the appropriate properties set for you. If you prefer not to use drag and drop you may also right click on the menu item and choose the Add this launcher to panel from the pop-up menu. |
|