If you have not yet planned how you will set up your partitions, turn to
Appendix B. There you'll find an introduction to
basic disk partitioning concepts. As a bare minimum, you'll need an
appropriately-sized root partition, and a swap partition of at least 16
MB.
Figure 14-14 shows the two disk partitioning
applications that are available for you to use.
If you will be using fdisk to partition your
drive, please see the section called Using fdisk for those
instructions. If you select Disk Druid,
continue reading below.
Each line in the Current Disk Partitions section
represents a disk partition. In this example (Figure 14-15), there are Linux existing partitions.
Note the scroll bar to the right, which indicates that there may be
more partitions than can be displayed at one time. If you use the
Up and Down arrow keys, you can see
if there are any additional partitions. Each line in this section has
five different fields:
Mount Point -- Indicates where the partition
will be mounted when Red Hat Linux is installed (such as
/, /boot, or
swap).
Device -- Displays specific hard drive and
partition information.
Requested -- Shows the partition's initial
size.
Actual -- Shows the partition's current size.
Type -- Shows the partition's type.
As you scroll through the Current Disk Partitions
section, you might see an Unallocated Requested
Partitions title bar, followed by one or more partitions.
These are partitions that have been requested but, for one reason or
another, have not been allocated. A common reason for having an
unallocated partition is a lack of sufficient free space for the
partition. In any case, the reason the partition remains unallocated
will be displayed after the partition's mount point.
Each line in the Drive Summaries section
represents a hard disk on your system. Each line has the following
fields:
Drive -- Shows the hard disk's device name.
Geom [C/H/S] -- Shows the hard disk's
geometry. The geometry consists of three
numbers representing the number of cylinders, heads and sectors
as reported by the hard disk.
Total -- Shows the total available space on
the hard disk.
Used -- Shows how much of the hard disk's
space is currently allocated to partitions.
Free -- Shows how much of the hard disk's
space is still unallocated.
Bar Graph -- Presents a visual representation
of the space currently used on the hard disk. The more pound
signs there are between the square braces, the less free space
there is. In Figure 14-15, the bar graph
shows no free space.
Please Note
The Drive Summaries section is displayed only
to indicate your computer's disk configuration. It is not meant to
be used as a means of specifying the target hard drive for a given
partition. This is described more completely in the section called Adding a Partition.
These buttons control Disk Druid's actions.
They are used to add and delete partitions, and to change partition
attributes. In addition, there are buttons that are used to accept
the changes you've made, or to exit Disk
Druid entirely. Let's take a look at each button in
order.
Add -- Request a new partition. Selecting
this button causes a dialog box to appear containing fields that
must be filled in.
Edit -- Modify the mount point of the
partition currently highlighted in the Current Disk
Partitions section. Selecting this button will cause a
dialog box to appear allowing you to change the name of the mount
point.
Delete -- Delete the partition currently
highlighted in the Current Disk Partitions
section. Selecting this button will cause a dialog box to
appear asking you to confirm the deletion.
OK -- Confirm that changes made to your
system's partitions to be written to disk. You will be asked to
confirm the changes before Disk Druid
rewrites your hard disk partition table(s). In addition, any
mount points you've defined are passed to the installation
program, and will eventually be used by your Red Hat Linux system to
define the filesystem layout.
Back -- Abort without saving any changes
you've made. When this button is selected, the installation
program will take you back to the previous screen, so you can
start over.
Use the F5 (Reset) function key to discard all
changes you may have made while in Disk
Druid, and return the list of partitions to those read
from the partition table(s) on your hard disk(s). When selected,
you'll be asked to confirm whether you want to discard the
changes. Note that any mount points you've specified will be lost, and
will need to be reentered.
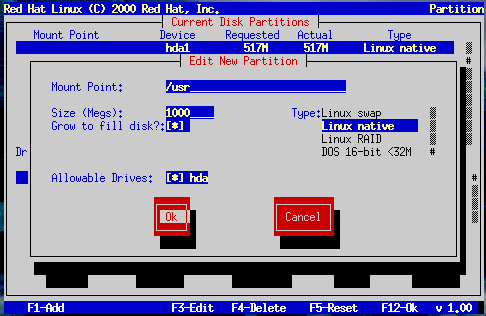
To add a new partition, select the Add button
and press Space or Enter. The
Edit New Partition dialog (Figure 14-16) appears.
Figure 14-16. Edit New Partition Dialog
The screen contains the following fields:
Mount Point -- Highlight this field and enter
the partition's mount point. For example, if this partition
should be the root partition, enter /; enter
/usr for the /usr
partition, and so on.
Size (Megs) -- In this field, enter the size
(in megabytes) of the partition. Note that this field starts with
a "1" in it, meaning that unless you change it, you'll end up with
a 1 MB partition. Delete it using the Backspace
key, and enter the desired partition size.
Grow to fill disk? -- This check box
indicates whether the size you entered in the previous field is to
be considered the partition's exact size, or its minimum size.
Press Space to select this option. When selected,
the partition will grow to fill all available space on the hard
disk. In this case, the partition's size will expand and contract
as other partitions are modified. If you make more than one
partition growable, the partitions will compete for the available
free space on the disk.
Type -- This field contains a list of
different partition types. Select the appropriate partition type
by using the Up and
Down arrow keys.
Allowable Drives -- This field contains a
list of the hard disks installed on your system, with a check box
for each. If a hard disk's box is checked, then this partition
may be created on that hard disk. By using different check box
settings, you can direct Disk Druid to
place partitions as you see fit, or let Disk
Druid decide where partitions should go.
OK -- Select this button and press
Space when you are satisfied with the partition's
settings, and wish to create it.
Cancel -- Select this button and press
Space when you don't want to create the
partition.
Unless you have a reason for doing otherwise, we recommend that you create the
following partitions:
A swap partition (at least 16MB) -- Swap partitions are used to support
virtual memory. In other words, data is written to a swap
partition when there is not enough RAM to store the data your system is
processing. If your computer has 16MB of RAM or less, you
must create a swap partition. Even if you have more
memory, a swap partition is still recommended. The minimum size of your swap
partition should be equal to your computer's RAM, or 16MB (whichever is
larger). In Disk Druid, the partition field for
swap should look similar to:
<Swap> hda2 125M 125M Linux swap
A /boot partition (16MB, maximum) -- The partition mounted
on /boot contains the operating system kernel (which allows
your system to boot Red Hat Linux), along with files used during the bootstrap process.
Due to the limitations of most PC BIOSes, creating a small partition to hold
these files is a good idea. This partition should be no larger than 16MB. In
Disk Druid, the partition field for
/boot should look similar to:
/boot hda1 16M 19M Linux native
A root partition (900MB-1.7GB) -- This is where
"/" (the root directory) resides. In this setup, all files
(except those stored in /boot) reside on the root
partition. A 850MB root partition will permit the equivalent of a
workstation-class installation (with very little free
space), while a 1.7GB root partition will let you install every package. In
Disk Druid, the partition field for / should look
similar to:
If you are having problems adding a partition, turn to Appendix B, An Introduction to Disk
Partitions, to find a solution.
If you attempt to add a partition and Disk
Druid can't carry out your request, you'll see a dialog
box listing any partitions that are currently unallocated, along with
the reason they could not be allocated, as in Figure 14-17. Select the
OK button, and press Space to
continue. Note that the unallocated partition(s) are also displayed
on Disk Druid's main screen (though you may
have to scroll the Current Disk Partitions
section to see them).
To change a partition's mount point, highlight the partition in the
Current Disk Partitions section, select the
Edit button, and press Space.
The Edit Partition dialog is similar to the one
shown in Figure 14-16. The difference here is
that all fields except the mount point are read-only. To modify any
other value, delete the partition and add it again with the new
values.
To delete a partition, highlight the partition in the
Current Disk Partitions section, select the
Delete button, and press
Space. You will be asked to confirm the deletion.
Next, select which partitions you want to format (Figure 14-20). You must format all newly created
partitions and other partitions that contain old data (assuming they
don't contain data you wish to keep).
Figure 14-20. Choose Partitions to Format
Caution
If partitions such as /home or
/usr/local already exist and contain data you
wish to keep, do not select these for formatting.
When you have selected the partitions to format, press
Space. If you wish to check for bad blocks while
formatting each filesystem (recommended for those with older disk drives),
select Check for bad blocks during format.
Select OK, and press Space.
Please Note
Selecting check for bad blocks may dramatically increase
your total installation time. Since most newer hard drives are quite large in
size, checking for bad blocks may take a while depending on the size of your
hard drive.
If you chose a custom-class installation, you also chose which disk
partitioning application to use. This section only applies if you
opted to use fdisk.
Once you've selected fdisk, you'll be
presented with the Partition Disks dialog box
(Figure 14-21). In this box is a list of
every disk on your computer.
Using Tab, and the Up and
Down arrow keys, highlight the disk you'd like to
partition, select Edit, and press
Space.
You will then enter fdisk and can partition
the disk you selected. Repeat this process for each disk you want to
partition. When you're finished, select Done.
fdisk includes online help which is terse but
useful. Here are a few tips:
The command for help is m.
To list the current partition table, use the
p command (see Figure 14-22).
To add a new partition, use n.
Linux fdisk creates partitions of type
Linux native by default. When you create
a swap partition, don't forget to change it to type
Linux swap using the t
command. The value for the Linux swap
type is 82. For other partition types, use
the l command to see a list of partition
types and values.
Linux allows up to four (4) partitions on one disk. If you wish
to create more than that, one (and only one) of the four may be
an extended partition, which acts as a
container for one or more logical
partitions. Since it acts as a container, the extended
partition must be at least as large as the total size of all the
logical partitions it is to contain.
It's a good idea to write down which partitions (e.g.,
/dev/hda2) are meant for which filesystems
(e.g., /usr) as you create each one.
Please Note
None of the changes you make take effect until you save them and
exit fdisk using the w
command. You can quit fdisk at any time
without saving changes by using the q command.
When you are finished partitioning your disks, press
Done; you may see a message indicating that
the installation program needs to reboot. This is a normal
occurrence after changing a disk's partition data; it usually
happens if you created, changed or deleted any extended
partitions. After you press OK, your machine
will reboot and the installation will begin again. Repeat the same
installation steps you performed earlier until you reach the
Partition Disks dialog; then simply choose
Done.



 Download