


 Download
 Online Shop
 Red Hat Network
|
|
|
Download
Online Shop
Red Hat Network
|
|
|
||
|
||
|
|
| Red Hat Documentation |
 |
Chapter 9. A Short Introduction to the GIMPThe GNU Image Manipulation Program (GIMP) can help you create, alter, manipulate and enhance digital image files -- photographs, scanned images, computer-generated images, and more. This chapter is intended to give you a quick overview of the GIMP and its more common applications. Like other fields, image manipulation has its own vocabulary. This chapter can't possibly provide complete documentation for all of the the terms and concepts needed for complete understanding of the GIMP. If you want to learn more, a variety of books are available which document the GIMP and its capabilities, as well as the background concepts of image manipulation. Please refer to the section called Where to Find More Information if you need more information about the GIMP. As you'll quickly find out if you try the GIMP, it includes a wealth of tools for editing images -- much more than could be described in a single chapter. Furthermore, if you can't create the right effect with the tools that the GIMP provides, and you're not afraid to write scripts in the Scheme scripting language, you can add a new Script-Fu to the GIMP. A Script-Fu is somewhat analogous to a macro in a word processing or spreadsheet application -- it applies a set series of effects (filters or other GIMP capabilities) to a graphic or piece of text. Anyone can use the pre-written Script-Fus included with the Gimp, but you can also write your own. See the section called Where to Find More Information for more sources of information about Script-Fus. The GIMP can do a lot of things, but it has some limitations. Graphic artists who create images for print media may find the GIMP lacking, or just more difficult to use, for pre-press applications. For example, the GIMP can't (yet) work in the CMYK (cyan, magenta, yellow and black) colorspace, which is generally used for printing color graphics. The GIMP instead uses the RGB (red, green and blue) colorspace, which should be familiar to people who have created graphics for the Web. Since the GIMP is well-suited for creating graphics for the Web, that's what we're going to do in this chapter. First, we'll edit a photo for display on a webpage. Then we'll create a background image, which will be tiled on the background of our webpage. Finally, we'll use the GIMP to create a title image for the webpage. Before we start "learning by doing," you'll need to know some basics: creating files, saving files, the Toolbox and Dialogs. GIMP BasicsTo use the GIMP, you'll need to know some of the basics. From an Xterm, you start the GIMP using the command (you guessed it): gimp. Like many applications, the GIMP provides more than one method to accomplish tasks. Generally, there are three ways to work in the GIMP:
When you start the GIMP, you'll see the Toolbox. The ToolboxThe GIMP Toolbox is a palette of commonly used GIMP tools: You can minimize the Toolbox (send it to the panel), but if you close the Toolbox, you're closing the GIMP. If you move your mouse over the individual buttons in the Toolbox, a pop-up dialog will appear to identify the tool's purpose. Click on the button for the tool you want to use in the Toolbox. The button will then be colored in, to indicate that it is the active tool. Generally, you use a tool on an image by activating the tool, then clicking and dragging on your image. If a portion of the image is selected, then the tool will only work on the selected portion. Selections are identified by a moving dotted-line border (called "marching ants"). Many of the tools have options. Double-clicking on the tool's button will display the Tool Options dialog for that tool. Tools in the Toolbox
ColorsAt the bottom of the Toolbox, you'll see the active colors display: The active color square is depressed; you can see in Figure 9-2 that the black foreground color square is the active color. By default, black is the active foreground color and white is the
active background color. To "flip" the foreground and background
colors, click on the Click on the active color box to display the Color Selection dialog: You can select a color "freehand," by choosing one of the radio buttons for hue, saturation, value, red, green or blue, picking a range of color from the middle bar, and then picking a specific color from the color square. You can also just type in the correct RGB values or the hexadecimal value for the color you want to select. As you choose colors by clicking on the color square, or by typing in exact values, you'll see the active color box on the Toolbox change to the new color. Color selection is a lot more complicated than what is covered here. If you're interested, you should check out some of the more in-depth resources in the section called Where to Find More Information. The Active Brush, Pattern and GradientA square on the bottom right of the Toolbox displays the active brush, pattern and gradient: If you want to choose a different brush, pattern or gradient, double-click on either the active brush, pattern or gradient to display the palette of choices for each. Click on a choice from the palette to make it the active brush, pattern or gradient. Selecting Areas in an ImageThe GIMP provides six selection tools. You can use these selection tools by clicking and dragging on the portion of the image you want to select. The GIMP also provides ways to modify your selection. These modifications will only work while your selection is active. You can recognize an active selection by the moving dotted line around its perimeter (marching ants).
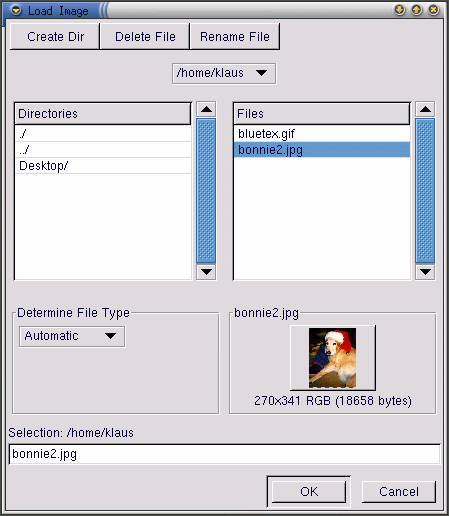
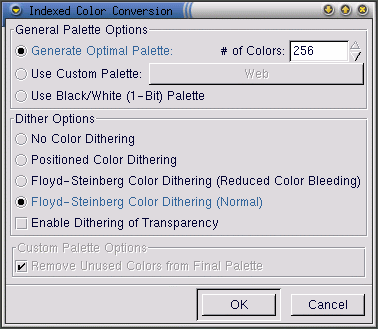
The Brush Selection DialogTo display the Brush Selection dialog, click on the active brush on the Toolbox. The Brush Selection dialog looks like Figure 9-5: When you use GIMP drawing tools, you can modify the attributes of the line you're drawing by selecting a particular brush. Click on a brush in the palette to select it. If the brush is larger than the square can display, click and hold to see the entire brush. Loading a FileBefore you can do any image manipulation, you need to somehow acquire an image. For example, you can scan an image, you can find one on the Internet (be careful about copyright restrictions!), or you can take a picture with a digital camera. To load an existing file, click on File => Open. You'll see the Load Image dialog, as shown in Figure 9-6. The Load Image dialog displays your working directory when you started GIMP. You can navigate up and down the filesystem tree by double-clicking on the Directories list on the left, then select a file to open from the Files list on the right. Filename completion is supported by the GIMP. If you type the first letter (or more) of a filename into the Selection field and press the Tab key, the view will change to only those subdirectories and/or files beginning with that letter or letters. The file you select will appear in the Selection field near the bottom of the dialog. A thumbnail preview will be dispalayed on the dialog; alternatively, you'll see a Generate Preview button. If you want to see a thumbnail of the image, click on the Generate Preview button. Once you've selected a file, click on the OK button to open it. You can also double-click on a filename to open the file. Saving a FileTo save an image file, right click on the image and choose File => Save (or Save as). You'll see the Save Image dialog if you choose Save as or if you choose Save but the file has not been saved before. The Save Image dialog looks almost exactly like the Load Image dialog and navigation of the filesystem tree and choosing files works in the same way. When you're saving an image, you'll need to choose what format to save it in. The GIMP supports a wide variety of image formats. In this chapter, we're going to talk about three of them: .gif, .jpg and .xcf. Image FormatsThe vast majority of images on the Web are in one of two formats: .gif or .jpg. Both formats utilize compression to provide smaller file sizes and shorter download times (download speed is of paramount importance for everything on the Web). In most other ways, however, these two image formats are very different, and they're best used for different purposes. The .jpg format is best used for photographs or images which use a lot of different colors. The .gif format is best used for images which only use a few colors or which incorporate relatively large areas of the same color. Before the GIMP will allow you to save an image as a .gif, you'll need to convert to indexed color or to grayscale. Convert an image to indexed color by right-clicking on the image and then selecting Image => Mode => Indexed. The Indexed Color Conversion dialog will be displayed: To minimize file size, a .gif image can only display a maximum of 256 colors. When you convert to indexed color, the RGB colors in the image are "standardized" to a particular palette of colors. If your image is going to be used on the Web, the safest palette choice is Use Custom Palette: Web. The palette optimized for the Web includes the group of 216 colors that are used by the majority of Web browsers. After you've converted your image to indexed format, the GIMP will allow you to save it as a .gif file. If you're working on an image in the GIMP, and you want to save it in order to keep working on it later, you should save it as a .xcf file. The .xcf format is the GIMP's native file format. If you create an image in the GIMP, or if you open an image and add GIMP effects (such as layers or masks) to it, you have added information to the image file. This information will be lost if you save the image as a .gif or .jpg. If you save a file as a .xcf file, you'll preserve that information. When you re-open the .xcf file, you'll be able to edit the file as if you had never closed it. The Image WindowWhen you load an image or open a new image, the GIMP surrounds the image with a frame which includes helpful information and tools, as shown in Figure 9-8. At the top, the image window displays a file identifer consisting of:
At the top left, if you click on the To help you visualize the size of your image, the GIMP provides horizontal and vertical rulers. You can toggle these off and on by right-clicking on the image and selecting View => Toggle Rulers. At the bottom left, you'll see the position of the mouse cursor on the image, measured from 0,0 at the top left corner. Just above the mouse cursor position window, you'll see two square icons, which are used for creating quick masks. Basically, masks are selections which can be saved and used again. We won't cover masks in this elementary chapter, but if you use the GIMP for complex images, you'll find masks to be very helpful. Please see some of the sources listed in the section called Where to Find More Information for more information on masks. Near the bottom right, you'll see an icon that looks like the move tool icon. This is called the panner. If you're zoomed in on an image, you can click on the panner to display a thumbnail of the whole image. Then you can click and drag on the thumbnail to pan the image view in your image window. Along the bottom of the window, next to the mouse cursor position window, you'll see two status fields and then a Cancel button. The first status field displays the file name, unless a plug-in is running (for example, if you're applying a filter or a Script-Fu to an image). If a plug-in is running, the name of the plug-in will appear in the first status window. The next field is empty, but will display a status bar for a running plug-in. Finally, the Cancel button allows you to stop a running plug-in. Helpful Keyboard ShortcutsLike many other applications, the GIMP makes it easy to accomplish tasks without taking your hands off the keyboard. Here are a selection of helpful keyboard shortcut commands: |
|
|
|
|
|
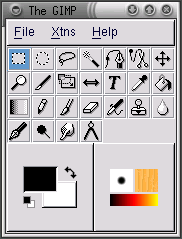
 Select rectangular regions
 Select elliptical regions
 Select hand-drawn regions
 Select contiguous regions
 Select regions using Bezier curves
 Select shapes from image
 Move layers and selections
 Zoom in & out
 Crop the image
 Transform the layer or selection
 Flip the layer or selection
 Add text to the image
 Pick colors from the image
 Fill with a color or pattern
 Fill with a color gradient
 Draw sharp pencil strokes
 Paint fuzzy brush strokes
 Erase to foreground or transparency
 Airbrush with variable pressure
 Paint using patterns or image regions
 Blur or sharpen
 Draw in ink
 Dodge or Burn
 Smudge
 Measure distances and angles
 .
.



 icon, the image
menu will appear.
icon, the image
menu will appear.