| Red Hat Documentation |
 |
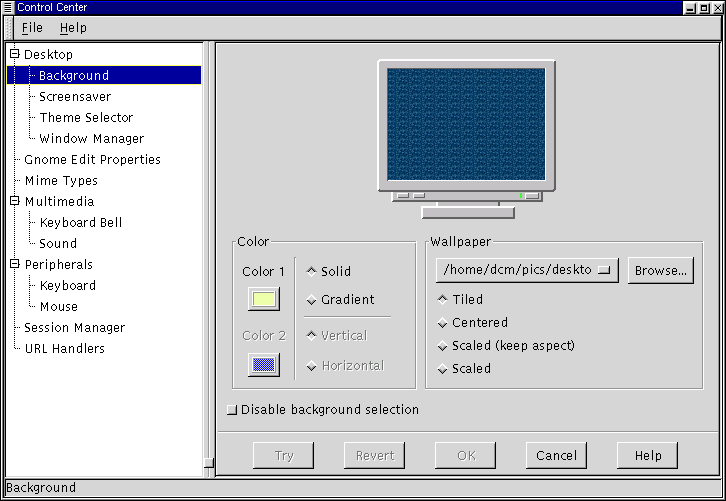
Desktop CappletsThe Background Properties CappletThe properties for your background image can be set here by either selecting a color or an image. If you select a color you have the option of having Solid or Gradient colors. If you choose to have Gradient colors you may choose between a Vertical or Horizontal gradient and choose the second color for the gradient to end on. If you decide to have an image as wallpaper you may browse for the image you wish to use. Once you have found your image you need to decide whether you would like to have the image tiled across the screen, centered, scaled up while keeping the same aspect, or simply scaled up to fit the screen. Once you have changed your background properties you may press the Try button at the bottom of the Control Center to make the change. If you would like to set the background by any other means you may disable this capplet by selecting Disable background selection. Figure 17-2. The Background Properties Capplet
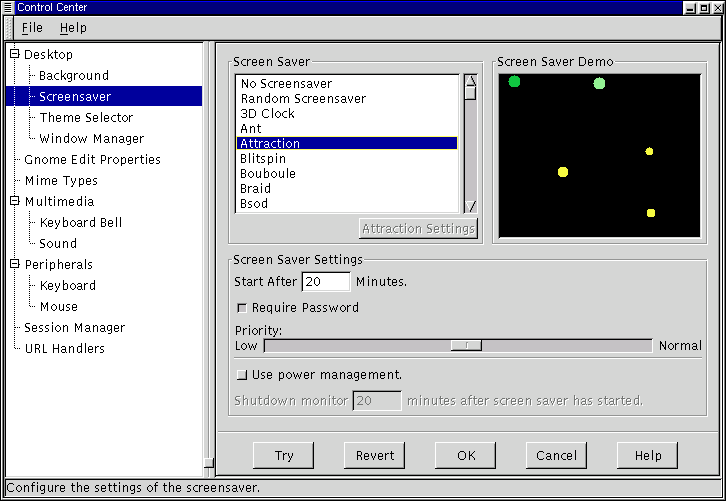
The Screensaver CappletIn this capplet you can change your xscreensaver properties. This capplet contains a list of available screen savers you may choose and a demo screen. Below these two dialogs you will see a set of tools that allow you to change the settings for the global screen saver properties. If the screen saver you choose has particular settings you can change those by pressing the Settings button that appears below the Screen Saver list. Global Screen Saver settings - In this section of the capplet you can change the time, password, and power management properties. You can decide how long you would like the screen saver to wait before starting by typing the number of minutes in the Start After text box. If you would like a password to return to your desktop click the Require Password button. Your account login password is the password set for the screen saver. You are also given the option of using power management -- if your monitor is capable of it. You may set the time to wait before the monitor is shut off by typing the time in the Shutdown monitor text box. Figure 17-3. The Screensaver Properties Capplet
Theme SelectorThe Appearances capplets contains the Theme Selector which allows you to select which GTK theme you would like to run. GTK themes are coordinated settings that allow the GTK widget set to change its look and feel. The widget set is the set of tools that provide buttons, scrollbars, checkboxes, etc. to applications. GNOME compliant applications use the GTK tool set so most of your GNOME applications will change their look and feel if you change the GTK theme. To change your GTK theme select a theme from the Available Themes list on the left side of the main workspace. If you have Auto Preview selected you will be able to see what the theme looks like in the preview window below. If you like the theme press the Try button on the bottom of the GNOME Control Center to install it. There are a few GTK themes that come loaded with GNOME when you install it. If you would like more themes you can check resources on the Internet like http://gtk.themes.org. Once you have found and downloaded a theme you like, press the Install new theme button. This will launch a file browser that allows you to find the theme you have just downloaded. The theme files should be in a tar.gz or .tgz format(otherwise known as a "tarball"). Once you have found the file press the OK and gnome will install the theme for you automatically. Now you can look in the Available Themes list for the theme you have installed. Once the theme has been unpacked into the .themes directory it will be listed in the available themes window the next time you start the GNOME Control Center. Figure 17-4. The Theme Selector Capplet
If you would like to change the font used in the current theme you may do so by selecting the Use custom font checkbox and selecting the font from the font button below it. This will bring up a font selection dialog that allows you to specify the font, its style, and size. Window Manager CappletBecause GNOME is not dependent on any one window manager this capplet allows you to select which window manager you wish to use. The Window Manager capplet does not determine which window managers you have available but allows you to define what, and where they are. Figure 17-5. Window Manager Capplet
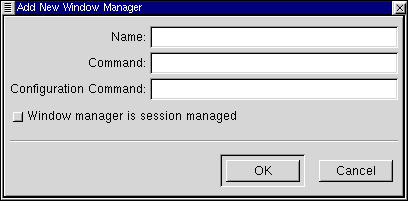
The Window Manager capplet has a main list of the window managers that you can currently select from. Whichever window manager is active is notated by the word "Current". If you wish to add a new window manager to the main list you may press the Add button. This will launch the Add New Window Manager dialog. Figure 17-6. Add New Window Manager
In the Add New Window Manager dialog you may specify the name you wish to give the window manager, the command to launch that window manager, and the command to launch any configuration tool that might be available for that window manager. If you know that the window manager is fully GNOME compliant and can be session managed you may select the Window manager is session managed button. If you are unsure you should check the documentation of your window manager. Press OK when you are done. Once you have finished adding your new window manager you will see it appear in the main list of window managers. If you need to change any of the properties you set in the Add New Window Manager dialog you may select the window manager from the main list with your mouse and press the Edit button. You may also delete any window manager in the main list by selecting it with your mouse and pressing the Delete button. If you are ready to switch the current window manager you may select the manager you wish to run from the main list and press the Try button. If you would like to run the configuration tool, make sure the manager you want to configure is selected and press the Run Configuration Tool for [window manager name] button. |
|
||||||