| Red Hat Documentation |
 |
Chapter 5. Getting Online
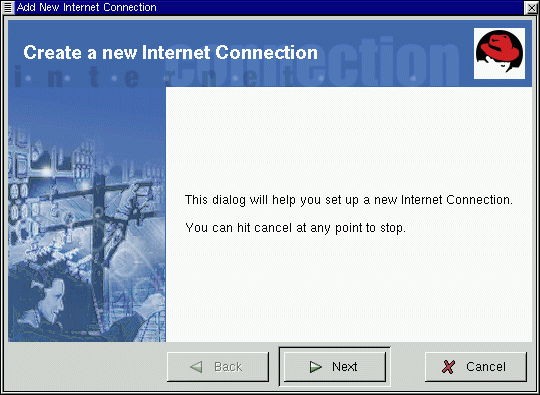
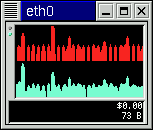
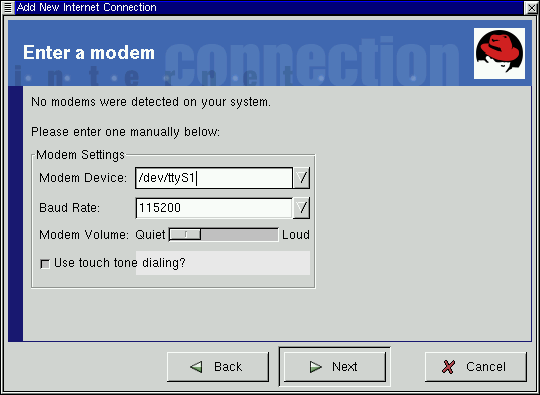
New to Red Hat Linux 6.1 is RP3, the Red Hat PPP Dialer utility which can make easy work of connecting to the Internet or to some other network devices. You can use RP3 to connect your modem to a PPP account, then view statistics about the connection, such as connect time, speed and cost of the current selection. In many cases, your only requirement for establishing a connection is having a valid Internet account. RP3 can also be used to monitor and control other networking devices, such as ethernet cards. Using RP3 to ConnectYou can start RP3 by going to the GNOME Main Menu Button => Panel => Add applet => Network => RH PPP Dialer. The application will then dock into the Panel. Another way to start the application and dock it into the Panel is to right-click on the Panel, then go to Add applet => Network => RH PPP Dialer. You can also launch RP3 -- without docking it into the Panel -- from either the GNOME Panel (by going to Internet => RH PPP Dialer) or from the shell prompt, by typing /usr/bin/rp3 in an Xterm window. To see all of your user-controllable network devices, such as a modem and ethernet card, from the Main Menu Button go to Internet => RH Network Monitor. Similar to the two previous methods, the application will appear on the desktop, rather than docking into the Panel. The Add New Internet Connection dialog allows you to easily configure your system for an Internet connection, helping you to locate your modem, enter the account information and connect. After you have successfully configured your Internet account -- or if you already have devices which are currently configured for network use -- you'll see a screen like Figure 5-1, which will show your currently configured devices or accounts. Creating a New Internet AccountTo create a new PPP account, start RP3. If you don't already have devices configured, you'll see the Add New Internet Connection dialog (see Figure 5-2). If there are devices detected, such as an ethernet card, you can simply choose a listed device so that the application is running on the Panel or the desktop, as in Figure 5-3. Once the application is running, right-click on the application to open the options menu and select Configure PPP... Next, type your root password when you're prompted and click the OK button to continue to the opening screen for the Add New Internet Connection tool. To proceed, select the Next button; to quit the utility without making any changes or additions, use the Cancel button. You can cancel without saving changes at any time throughout the process; you can also return to a previously completed screen by using the Back button. Your next task is to configure a modem. RP3 will try to automatically detect a modem on your system. Regardless of its success, you'll find a modem configuration dialog, similar to that in Figure 5-4. In the modem settings dialog, you can specify the location of your modem, its highest baud rate, your preference regarding the volume of the call and whether to use touch tone dialing. Like the modemtool utility, you can specify the serial port to which your modem is connected, and a link will be created to /dev/modem. Although RP3 attempts to detect the correct port, you can adjust the results in this dialog. If you know that your modem is attached to COM2 under Windows, for example, its location in Linux will be /dev/ttyS1. Here is a comparison of serial line names in MS-DOS (and Windows) and Linux:
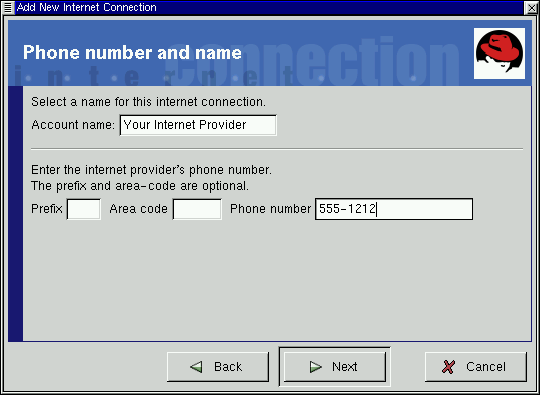
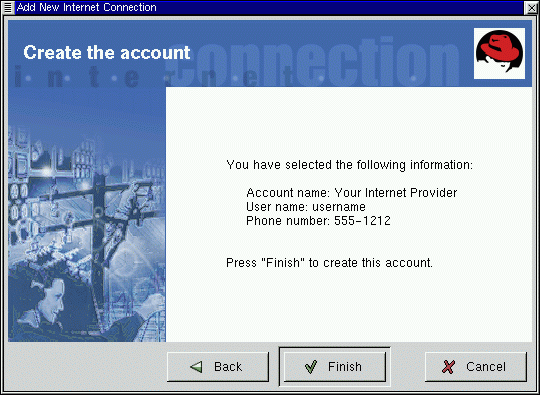
Using the drop-down list in the Modem Device box, enter the serial port to which your modem is connected. Then, in Baud Rate, enter the fastest recommended speed for your modem (a typical 56k device, for example, would have a baud rate of 115200). You can also select your volume and dialing preferences in this dialog. Dragging the bar to Loud in the Modem Volume entry will let you hear everything that goes on during a connection -- from dialtone to the connection negotiation. Note, however, that some modems will allow only a sound on/sound off configuration, rather than gradations of volume. The Use touch tone dialing button, when selected, will dial using touch tone; when deselected, you'll dial using pulse. Once you're satisfied with your settings, click on Next to proceed to the following screen. In the Phone number and name dialog (see Figure 5-5), you should enter both the name you would like to give your account and the telephone number of your Internet service provider. Ordinarily, it isn't necessary to provide the prefix or area code of your ISP. If you must dial a "9" to reach an outside line, enter this number in the Prefix field. To disable call waiting, type *70 in this field. RP3 uses an application called Wvdial for some of its functions, such as dialing and authentication with the PPP server. To learn about other dialing options which might be available, type man wvdial in an Xterm window. (Use the Space bar to move forward through the document a "page" at a time; use the B key to move back, and use the Q key to quit.) The dialog which follows, User name and password, asks you to provide the name you use to sign on to your ISP, as well as your login password for the service. Your password will appear as a series of asterisks. In the Other Options dialog, you can choose a pre-selected ISP or a Generic Account if your ISP isn't listed. If your ISP is listed, you should select the appropriate entry, due to variations in connection protocols which require specific network negotiations between your system and your ISP's. You can check your information in the Create the account dialog which follows (see Figure 5-6). Presented here will be the information you had provided in the previous screens. If you're satisfied with your entries, click Finish to create the account; if you want to modify the information, select the Back button to go to a previous screen. The configuration tool modifies multiple files. The main files which are affected are /etc/sysconfig/network-scripts/ifcfg-ppp* and /etc/wvdial.conf. If you find it necessary to modify an existing entry, however, you can edit that entry with RP3, rather than hand-edit a file. See the section called Customizing and Configuring for more information on customizing the settings. Connecting and DisconnectingOnce you have configured your PPP account, start RP3 (right-click on the Panel => Add applet => Network => RH PPP Dialer). When the application starts, you'll be asked to select which interface you want to activate; choose the name of the PPP service you created. Next, he application will start by showing you the monitor for the connection (see Figure 5-3). To begin your online session, left-click on the monitor and, in the dialog which asks whether you want to start the interface, select Yes. (You can also right-click on the monitor, then drag your cursor to the Connect to... entry showing your ISP account name.) Similar to the procedure for connecting, you can disconnect to end your online session by left-clicking on the monitor, then choosing Yes to stop the interface. (Also, you can use the Disconnect from... entry by right-clicking on the monitor.) Working with the RP3 MonitorWhen the RP3 monitor is docked on the Panel, it will appear similar to Figure 5-7. During the time you're connected, the RP3 monitor will display two bar graphs showing connection activity: the top graph will show data transmitted, and the bottom graph will show data received (see Figure 5-8). Beneath the graphs, you'll find two text entries which can display either your total connection time and the bytes received per second or your total cost per session, as well as the bytes received per second. |
|